PROCESSING AND ENHANCEMENT

In this section we have added a series of tutorials aimed at assisting in the processing of RAW files into images
and enhancing images using Adobe Photoshop and Lightroom.
The importance of backing up your image files by Michael Smyth
There is nothing more important than making backups of your images files, because there are many ways that devices can fail or you can lose your important images through error. In this tutorial we examine the best ways to set up your backups and how to avoid the many pitfalls that you can fall into.
Read the full tutorial HERE…
Backing up your photo files wil lprotect your most treasured possessions
Monitor calibration - Why we need it by Michael Smyth
Monitor calibration is a necessary step in the digital workflow, to ensure we are seeing and editing colour and brightness information correctly. Here we explain the applicable standards and how to apply them to your workflow. Read the full tutorial HERE…
Without a correctly calibrated monitor, you won’t be able to see your image colours correctly.
Unlocking the power of “Blend If” for creative expression by Michael Smyth
Combining two images together is a common way to add some creativity to our images, but sometimes the task of preparing a mask to define the areas to be combined is a really onerous task. It would be great if there was a way to do this without needing a mask. The good news is, there is such a method available and it’s called “Blend If”. When it works, it works really well, but there are some limitations to it’s effectiveness, which we explain. Read the full tutorial HERE…
Understanding curves by Michael Smyth
Most experts advocate using Curves as the preferred method of changing tonality in images, but there are other tools that seem to do the same thing, so why use Curves ?
Changing the tonality or luminosity of parts of our image is one of the 5 key things that we can do to enhance our images. Given that humans respond most strongly to brightness in a scene, this is arguably the most import aspect of image processing, so why should we use curves instead of the other methods ?
Here we show the differences between Levels, Brightness/Contrast and Curves and explain why it is much better to use Curves on our images. Read the full tutorial HERE…
Curves are the most sophisticated way to adjust your image, but there are issues with saturation changes.
Read the full article to find out why.
Copyright your photographs by Michael Smyth
The internet and social media is rife with theives and people who will happily steal and use your prized images. Not to mention well measning but ignorant friends and relatives, so be prepared to protect your images with appropriate copyrighting. You may not be able to prevent your images being stolen, but with the right protection, you may have some rights to pursue compensation in the event it happens to you. Note: This is not meant to be a legallly defensible position as copyright laws vary form country to country, this is merely provided to help you take the minimum steps to protect your intellectual poroperty. Click HERE to read the full tutorial.
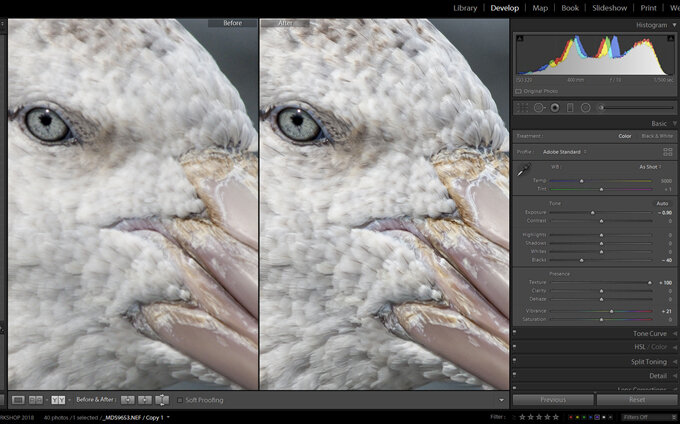
Texture, Clarity, Sharpening and Noise Reduction by Michael Smyth
With the introduction of the new Texture slider in the Lightroom Basic panel, many people have asked, “what is the difference between them and how do we use them?” In this tutorial we explain the differences between all these controls and how to use them for best effect. Click HERE for the full tutorial.
Above: A comparison of the application of Texture to an image with fine details. (c) Michael Smyth 2019
How to Use Clarity in Lightroom by Michael Smyth
The Clarity tool is often misunderstood and not used correctly in processing RAW files. In this short tutorial we explain what Clarity is, how it should be used and how to use it for creative effect. Click HERE for details.

Images with fine detail can benefit from using the Clarity tool, together with other processing in Lightroom. (c) Michael Smyth 2017
The importance of Sharpening Image files by Michael Smyth
Many photographers are unaware of the need to sharpen their image files, at the RAW processing stage, during editing in Photoshop and for output. This short tutorial gives an overview of the types of sharpening to be applied as well as the when and how. Click HERE for details
Above Left: original RAW file, no Sharpening Above Right: RAW file with RAW Sharpening and Photoshop Sharpening
Lightroom Keyboard Shortcuts
Thanks to a free download from The Lightroom Queen, www.lightroomqueen.com here is a list of available keyboard shortcuts for use in Lightroom. Click HERE for details
From Lightroom to Photoshop and back again by Michael Smyth
Many people struggle with the digital workflow and deciding what to edit in Lightroom and what to edit in Photoshop. Some find it difficult to work out the relationship between Lightroom and Photoshop. Some also struggle with the Lightroom catalogue and how to keep everything updated and synchronised.
As a general rule, photographers who are primarily interested in “Documentary” or “Eyewitness” style of photography may never need to move into Photoshop for completing their images. Those who wish to infuse their images with a degree of creativity, or who want to work to restore the 3rd dimension in their work will almost certainly need to work with Photoshop as well as Lightroom.
This tutorial has been updated and is now part of our workshop series. Click HERE for details
Couta roacks Tasmania (c) Michael Smyth 2016 Edited in Lightroom and Photoshop
Practical use of Blend Modes in Photoshop by Jim Crew
Layer blend modes in Photoshop offer a quick and easy method for editing to perform processes
such as adding contrast, darkening skies, lightening shadows and adding soft focus effects to name
just a few. Photoshop CC includes 27 different layer blend modes. The examples used here are for illustration purposes only. Read more

Removing Bright Fringes in Photoshop by Michael Smyth
This tutorial demonstrates a method of removing unsightly bright edges around image elements on photographs that have been extensively edited in Photoshop. Often, after spending a lot of time refining and polishing an image in Photoshop you can end up with some rather nasty bright lines or fringes around contrasting edges of image elements. Here is my method of removing these edges. Read more...
The Crashed DC3, Iceland 2015 (c) Michael Smyth

Above: Detail showing the bright edges before treatment

Above: Detail of the finished image
Introduction to Photoshop layers by Michael Smyth
This tutorial introduces the concept of "layers" arguably the most important function within Photoshop. Layers are a way of making "local" or "selective" adjustments to an image. Layers are also a way of applying adjustments to the whole of an image non destructively.
Local or selective adjustments are changes made to a part of the image only, whereas “Global” changes apply to the whole of the image. Without layers you are pretty much restricted to global changes to your image, apart from things like cloning.
This tutorial has been updated and now forms part of our workshop series. Click HERE for details
Customline - from the Series "Extinct" by Michael Smyth
Creative technique - Adding textures and replacing skies by Michael Smyth
In this tutorial we will look at some of the most common and creative techniques available to enhance images and add a touch of creativity to photography. Isn't this cheating ?
Manipulating images and using creative techniques to produce images that reflect your vision of the world are nothing new and have been practiced since the beginning of photography. In-camera double exposure can create similar effects to the texture technique and darkroom techniques that replace elements of an image have been used for well over a hundred years by skilled photographers. The new digital techniques arising from digital capture and processing have made these techniques more widely accessible. In other words, no, it isn’t cheating ! Read More...

Dak-Dak graveyard by Michael Smyth
Exposure for creative image making by Michael Smyth
This tutorial discusses how to use exposure as a creative tool in image making and how it is used to convey meaning in our images.
WHAT IS EXPOSURE: Exposure in its simplest form is the process of allowing a specific amount of light to fall on the sensor (or film) in our camera. The camera controls that affect the amount of light that reaches the sensor are: the Aperture of the lens being used; the Shutter Speed selected, and The ISO sensitivity setting applied.
WHAT IS “CORRECT” EXPOSURE: Wikipedia defines exposure thus: “Correct exposure may be defined as an exposure that achieves the effect the photographer intended” Read More...
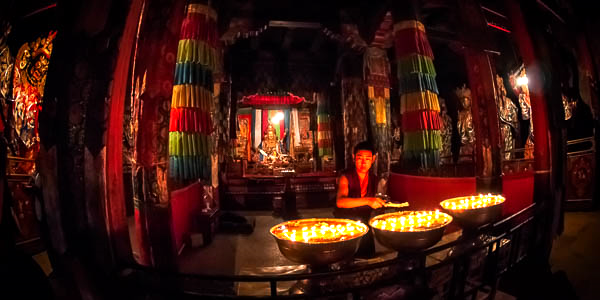
Monk with butter lamps, Samye Monastery, Tibet By Michael Smyth
Establishing a colour managed workflow by Michael Smyth
The goal of any photographer in the Digital age is to capture, process and print images with consistent and accurate results. In addition, you may also want to have your images presented on a website, projected at a camera club on a data projector, or publish a book through a third party publisher. In each case you will want to ensure that colours are represented accurately no matter where or how they are viewed.
Therefore a system of managing and controlling colour both within your working environment and across all other devices is of paramount importance. This is what a Colour Managed Workflow seeks to achieve. Read More...

Colours of Greenland by Michael Smyth
Backing up your data by Jim Crew and Michael Smyth
A computer expert was recently discussing the issue of backups on a radio talk show. He summarised the situation as this: "There are two types of people who use computers: Those that have had a disc failure, and those that are going to have one".
Backing up your valuable data (not only your photographs, but all of your personal information is not only wise, it's essential. There are several ways to create backups and we discuss several methods and processes in this tutorial. Read More...

Lightning strike by Michael Smyth
Camera Basics by Michael Smyth
A camera in its most basic form is merely a light proof box with a lens (for focusing on a subject) and a shutter and aperture to allow a fixed amount of light to pass to a light sensitive material ( either film or a digital sensor).
The name “Camera” derives from the Latin term “Camera Obscura”, which literally means a dark room.
In the days before photography the Camera Obscura was a popular diversion for the wealthy and were room sized contraptions where you could see the outside world through a small pinhole or lens. Read More…
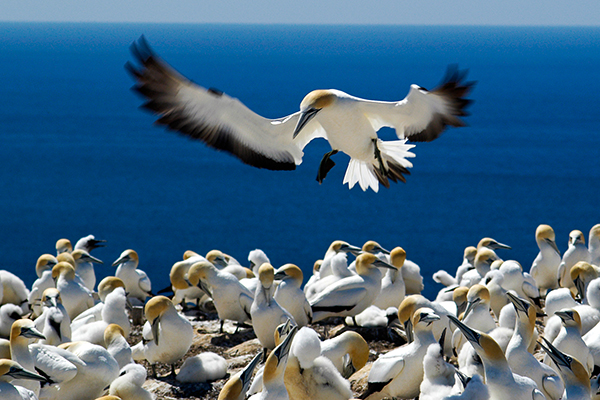
Gannet landing by Michael Smyth